Product details description
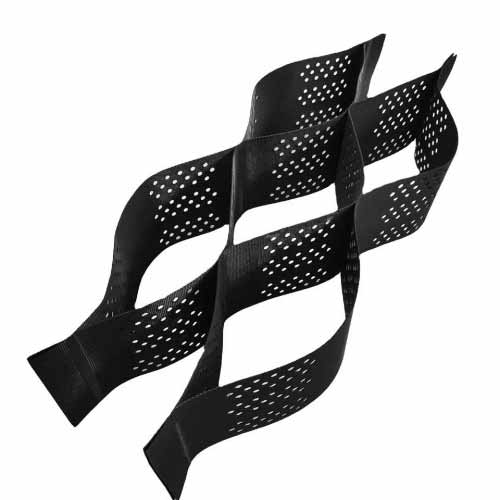
Geocells, three-dimensional honeycomb-like structures made from
high-density polyethylene (HDPE) or other synthetic materials, are widely used
in geotechnical engineering for soil reinforcement, slope stabilization, and
pavement construction. The effectiveness of geocell systems depends largely on
the quality of their installation, as improper installation can compromise their
structural integrity and performance. Professional construction techniques
ensure that geocells are installed correctly, maximizing their ability to
confine soil, distribute loads, and enhance the stability of the engineered
structure. This article outlines the key steps and professional techniques
involved in the geocell installation process.
Site preparation is the first and most critical step in the geocell
installation process. The site must be cleared of all debris, vegetation, and
large rocks that could damage the geocell material or create uneven surfaces.
The subgrade soil should then be graded and compacted to achieve a smooth,
stable base with the required compaction density (typically 95% of the maximum
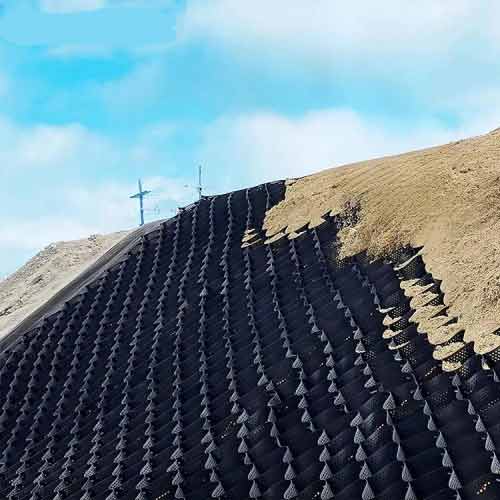
dry density). For slope stabilization projects, the slope should be trimmed to
the correct angle and compacted to prevent soil movement during and after
installation. Additionally, a geotextile fabric is often laid over the compacted
subgrade to provide additional separation and reinforcement, preventing soil
particles from passing through the geocell apertures and ensuring proper load
distribution.
The second step involves unrolling and expanding the geocell panels.
Geocells are supplied in a collapsed, flat state for easy transportation and
storage. Professional installers unroll the panels over the prepared subgrade,
ensuring that they are aligned correctly with the project’s design
specifications (e.g., along the direction of the slope or pavement). The panels
are then expanded into their three-dimensional honeycomb shape by pulling them
apart at the joints. It is crucial to ensure that the geocells are fully
expanded and that the cell walls are vertical, as this maximizes their soil
confinement capacity. Any wrinkles or folds in the geocell material should be
smoothed out to avoid uneven load distribution.
Once the geocells are expanded, they are anchored to the subgrade to
prevent movement during filling and compaction. Anchoring techniques vary
depending on the application: for flat surfaces such as pavements, steel stakes
or ground anchors are driven through the geocell joints into the compacted
subgrade. For slope applications, additional anchoring along the top and bottom
of the slope is required to resist the downward pull of the filled soil.
Professional installers ensure that the anchors are spaced correctly (typically
1-2 meters apart) and driven deep enough to provide secure fixation. After
anchoring, the geocell cells are filled with the appropriate infill material,
which can be soil, gravel, sand, or a mixture of these. The infill material
should be placed in layers (15-20 cm thick) and compacted thoroughly using a
vibratory compactor to achieve the required density.
The final step in the geocell installation process is finishing and quality
control. After filling and compaction, the top surface of the infill material is
graded to ensure a smooth, even finish. Any excess geocell material along the
edges of the project area is trimmed to the correct size. Quality control
inspections are then conducted to verify that the geocells are properly
expanded, anchored, and filled, and that the infill material meets the required
compaction density. Professional installers also check for any damage to the
geocell material, such as tears or punctures, and repair them promptly. By
following these professional construction techniques, geocell systems can be
installed to meet design requirements, ensuring long-term performance in soil
reinforcement and slope stabilization projects.
geocell slope geocell application geocell retaining wall geocell on slope
Previous article:
Geocell Cellular Structure: Engineering Design and Functions
Next article:no more